白皮书
Formlabs Logo

Setting up your Form 4 generation printer

Setting up your Form 4 generation printer

开机

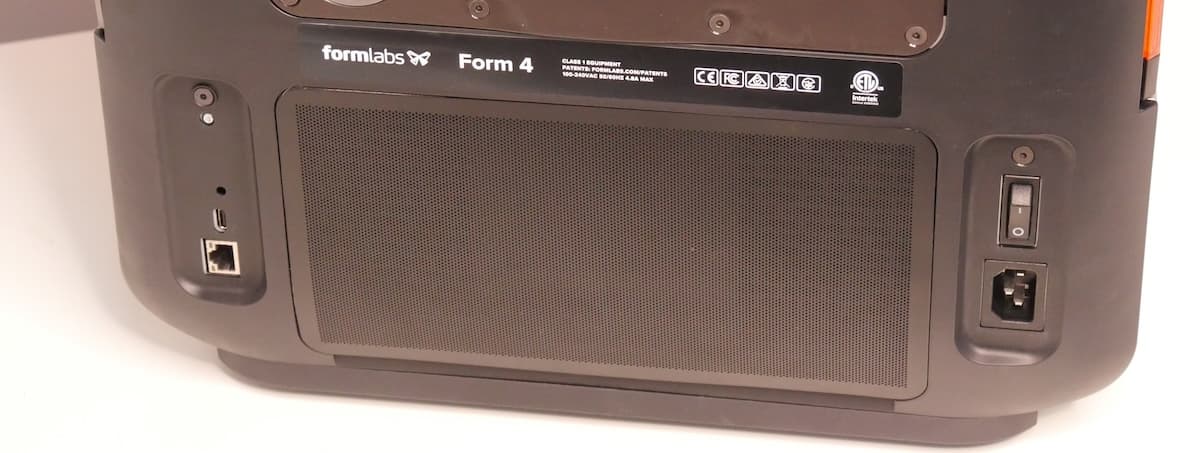
使用电源线连接打印机和电源。打开打印机背面左侧的电源开关。

Rear ports on a Form 4 generation printer

首次连接打印机到电源时,打印机将在触摸屏上显示一系列新手培训步骤。新手培训步骤包括将耗材(树脂槽、混合器、树脂盒和构建平台)插入打印机的说明。请遵循以下步骤准备打印机以供使用。

注:

如果打印机没有初始化并显示新手培训提示,请确保机罩已关闭。如果已关闭,请打开机罩,检查位于机罩底部边缘的两个圆形互锁磁铁。如果其中一块磁铁从机罩上脱落,则可能吸附在打印机外壳上或卡在其中一个树脂槽锁销下方。用粘合剂将磁铁粘附在机罩上,晾干后关闭机罩即可继续使用。

插入树脂槽和混合器

警告:

树脂可能引起皮肤刺激或皮肤过敏反应。处理液态树脂或树脂涂层表面时,请戴上手套。用大量肥皂和水冲洗皮肤。

The resin tank is the primary container for holding resin after it is dispensed from the cartridge. Resin is cured onto the build platform when light passes through the tank's bottom film during printing.

The resin mixer improves print consistency by evenly mixing the resin and checking for debris.

  1. Lift the printer’s cover.
  2. Remove all packaging from the resin tank before inserting it into the printer.
  3. Remove the resin tank lid and set it aside.
  4. With the tank spout facing away from you, place the resin tank flat between the blue latches in the middle of the printer.
  5. Press down on the sides of the resin tank with your thumbs. Latch the tank into place by closing the two latch handles on the sides.
  1. Remove all packaging from the resin mixer before inserting it into the printer.
  2. Open the latch on the mixer before inserting it into the printer.
  3. Insert the mixer into the mixer mount with the flat body in the tank. If the two parts of the mixer have come apart, reassemble the mixer first.
  4. Lock the mixer into place by closing the latch.

安装构建平台

The build platform is the surface that each part prints onto. To insert the build platform:

  1. Lift the build platform latch.
  2. Align the build platform with the build platform mount and push into place.
  3. Lower the build platform latch to secure the build platform.

插入树脂盒

The resin cartridge stores resin to be dispensed into the resin tank. To prepare the resin cartridge:

  1. Shake the resin cartridge to ensure the resin is mixed well.

注意:

请勿取下树脂盒底部的橡胶咬阀或用锐器戳它。该咬阀控制树脂的释放。若取下橡胶咬阀,树脂会不断地从树脂盒中流出来,并流进机器中,会对机器造成严重的损坏。这种损坏不在保修范围内。

  1. Align the cartridge with the opening at the back of the printer.
  2. Lower the resin cartridge until the top of the cartridge is level with the top of the printer. The cartridge sits loosely inside the cartridge slot. This ensures the load cell can accurately measure cartridge resin levels.
  3. If the printer is on, it will display a message on the touchscreen and play a notification sound once it detects the cartridge.
  4. Press open the vent cap before starting a print so that the resin tank fills correctly.

Printing with the Form 4

现在打印机已设置完毕:

Setting up the Form 4B

The Form 4B is a dental and medical-specific 3D printer that is validated to print 14+ materials for biocompatible applications from the Formlabs materials library.

Form 4B printers need to be temporarily connected to the internet when the printer is being set up for the first time. While connected to the internet, the printer quickly and securely registers a Formlabs biocompatible materials lifetime license. This is a one time configuration that is saved for the lifetime of your printer, even if you perform a factory reset on the machine.

Notice:

Form 4B printers are not able to print with Formlabs materials for biocompatible applications until they have been temporarily connected to the internet.

The first time the printer is connected to power, it displays a series of onboarding steps on the touchscreen. The onboarding steps include instructions for inserting consumables (resin tank, mixer, resin cartridge, and build platform) into the printer. Follow these steps, as detailed above, to prepare the printer for use.

  1. Turn on your Form 4B.
  2. Follow the onboarding instructions. If you don’t see onboarding steps, tap Settings > General > Show onboarding on the printer touchscreen.
  3. When you are prompted to temporarily connect to the internet, connect to an available Wi-Fi network. If no network is available, you can also connect via Ethernet or a temporary mobile hotspot.
    • Wi-Fi: Tap the desired wireless network. If prompted, enter your network password and tap the checkmark to confirm.
    • Ethernet: Plug an Ethernet cable into the back of your printer, then plug the other end into the LAN port of your modem or router.
    • Mobile hotspot: Set up your hotspot and check that it is connected to the internet. Connect the printer to the hotspot via Wi-Fi or an Ethernet cable, depending on your device.
  4. When the onboarding steps are completed successfully, you should see Form 4B displayed at the top left of your touchscreen.
  5. You are now ready to print with any Formlabs material for biocompatible applications.

Checking if your Form 4B is set up correctly

When a Form 4B printer is set up correctly, the status bar on top of the printer touch screen will be blue and say Form 4B.
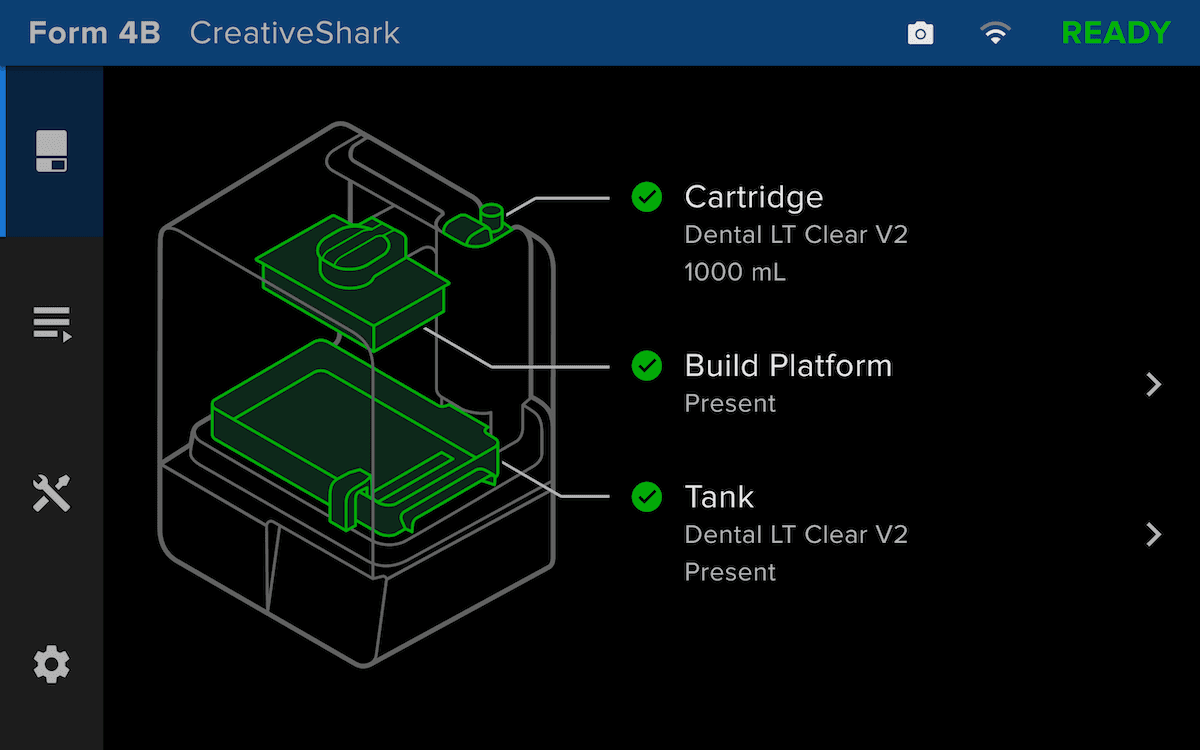
Form 4B status screen

Troubleshooting Form 4B setup

If you purchased a Form 4B printer but cannot print with a Formlabs material for biocompatible applications, please try the following troubleshooting steps.

  1. Follow the steps above to temporarily connect to the internet.
  2. Restart your printer using the power switch on the back left of the printer.
  3. Check if your printer says Form 4B in the top left of the touchscreen.
  4. If not, retry the printer onboarding wizard. Tap Settings > General > Show onboarding on the touchscreen and follow the steps.
  5. If your printer still doesn’t say Form 4B on the top left of the touchscreen, contact Formlabs Support.